Bitnami Magento2 安装Redis并且配置使用Redis
1.安装Redis
为了获得最新版本的Redis,我们将使用apt从Debian官方仓库中安装它。
apt通过键入以下内容来更新本地程序包缓存并安装Redis:
sudo apt updatesudo apt install redis-server
这将下载并安装Redis及其依赖项。然后,在Redis配置文件中进行一项重要的配置更改,该更改是在安装过程中自动生成的。
使用首选的文本编辑器打开此文件:
sudo nano /etc/redis/redis.conf
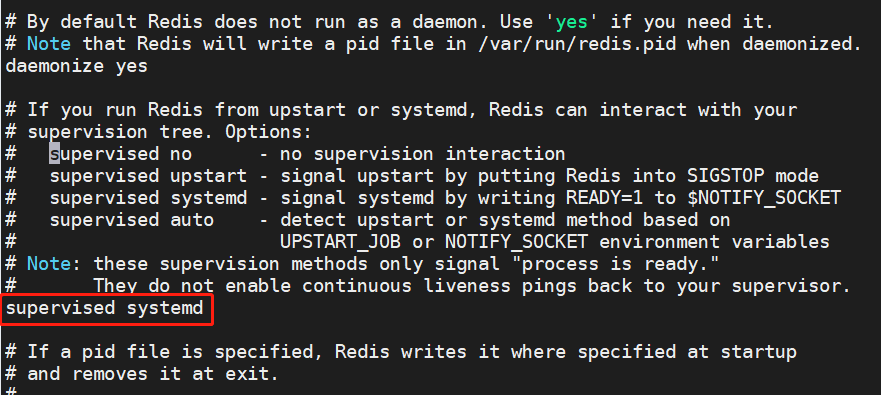
在文件内部,找到supervised指令。该指令允许您声明一个初始化系统来将Redis作为服务进行管理,从而为您提供对其操作的更多控制。该supervised指令no默认设置为。由于您正在运行使用systemd初始化系统的Debian,请将其更改为systemd:
这是您目前唯一需要对Redis配置文件进行的更改,因此请在完成后保存并关闭它。然后,重新加载Redis服务文件以反映您对配置文件所做的更改:
sudo systemctl restart redis
这样,您已经安装并配置了Redis,并且它在您的计算机上运行。不过,在开始使用它之前,先检查一下Redis是否运行正常是明智的。
2.测试Redis
与任何新安装的软件一样,在对其配置进行任何进一步更改之前,最好确保Redis能够按预期运行。我们将介绍几种方法来检查Redis在此步骤中是否正常工作。
在这里,您可以看到Redis正在运行并且已经启用,这意味着它被设置为在每次服务器启动时启动。
注意:对于Redis的许多常见用例,此设置是理想的。但是,如果您希望每次服务器启动时都手动启动Redis,则可以使用以下命令进行配置:
sudo systemctl disable redis
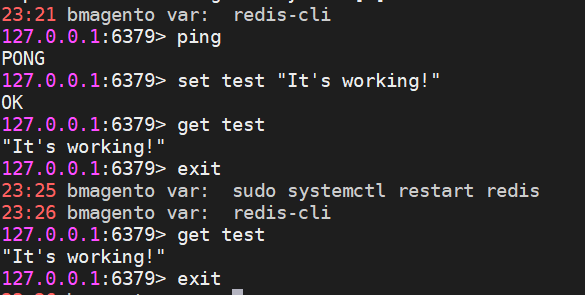
要测试Redis是否正常运行,请使用命令行客户端连接到服务器:
redis-cli
此输出确认服务器连接仍然有效。接下来,通过运行以下命令检查您是否可以设置密钥:
set test "It's working!"
通过键入以下内容来检索值:
get test
在确认您可以获取该值之后,退出Redis提示符以返回到Shell:
exit
作为最后的测试,我们将检查Redis即使在停止或重新启动之后也能够持久保存数据。为此,请首先重新启动Redis实例:
sudo systemctl restart redis
然后再次与命令行客户端连接,并确认您的测试值仍然可用,完成后再次退出外壳:
redis-cliget testexit
这样,您的Redis安装就可以完全运行并可以使用了。但是,其某些默认配置设置是不安全的,并为恶意行为者提供了攻击和访问服务器及其数据的机会。本教程的其余步骤介绍了Redis官方网站所规定的缓解这些漏洞的方法。尽管这些步骤是可选的,并且如果您选择不遵循这些步骤,则Redis仍将起作用,但强烈建议您完成这些步骤,以增强系统的安全性。
3.绑定到本地主机
默认情况下,只能从localhost访问Redis 。但是,如果您通过遵循与本教程不同的教程来安装和配置Redis,则可能已更新了配置文件以允许从任何地方进行连接。这不如绑定到localhost安全。
要更正此问题,请打开Redis配置文件进行编辑:
sudo nano /etc/redis/redis.conf
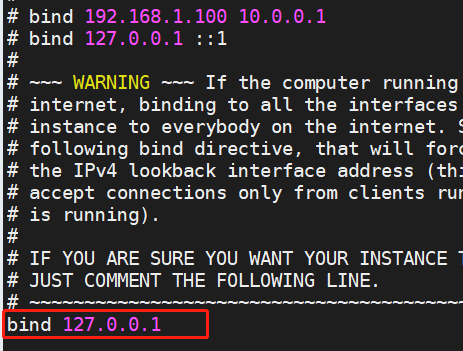
找到此行,并确保其未注释(删除,#如果存在):
然后,重新启动服务以确保systemd读取您的更改:
sudo systemctl restart redis
要检查此更改是否已生效,请运行以下netstat命令:
sudo netstat -lnp | grep redis

此输出显示该redis-server程序已绑定到localhost(127.0.0.1),反映了您刚刚对配置文件进行的更改。如果您在该列中看到另一个IP地址(0.0.0.0例如,),则应再次检查是否取消注释正确的行,然后再次重新启动Redis服务。
现在,您的Redis安装仅在localhost上进行侦听,对于恶意参与者而言,发出请求或访问您的服务器将更加困难。但是,Redis当前未设置为要求用户在更改其配置或保存的数据之前进行身份验证。为了解决这个问题,Redis允许您要求用户通过密码进行身份验证,然后才能通过Redis客户端(redis-cli)进行更改。
要将Magento安装配置为使用Redis进行会话存储,请打开app/etc/env.php文件并更改/添加以下内容:
把
'session' =>array ('save' => 'files',),
改成
'session' =>array ('save' => 'redis','redis' =>array ('host' => '127.0.0.1','port' => '6379','password' => '','timeout' => '2.5','persistent_identifier' => '','database' => '0','compression_threshold' => '2048','compression_library' => 'gzip','log_level' => '1','max_concurrency' => '6','break_after_frontend' => '5','break_after_adminhtml' => '30','first_lifetime' => '600','bot_first_lifetime' => '60','bot_lifetime' => '7200','disable_locking' => '0','min_lifetime' => '60','max_lifetime' => '2592000')),
设置成生产模式
'MAGE_MODE' => 'production',
并添加使用Redis作为页面缓存:
'cache' => ['frontend' => ['default' => ['id_prefix' => 'm2_','backend' => 'Cm_Cache_Backend_Redis','backend_options' => ['server' => '127.0.0.1','port' => '6379','persistent' => '','database' => 1,'force_standalone' => 0,'connect_retries' => 2,'read_timeout' => 10,'automatic_cleaning_factor' => 0,'compress_tags' => 1,'compress_data' => 1,'compress_threshold' => 20480,'compression_lib' => 'gzip']],'page_cache' => ['id_prefix' => 'm2_','backend' => 'Cm_Cache_Backend_Redis','backend_options' => ['server' => '127.0.0.1','port' => '6379','persistent' => '','database' => 2,'force_standalone' => 0,'connect_retries' => 2,'read_timeout' => 10,'automatic_cleaning_factor' => 0,'compress_tags' => 1,'compress_data' => 1,'compress_threshold' => 20480,'compression_lib' => 'gzip']],]]
最后再次刷新缓存:
sudo php bin/magento cache:flush
示例env.php配置代码
<?phpreturn array ('backend' =>array ('frontName' => 'admin',),'crypt' =>array ('key' => 'key密钥',),'session' =>array ('save' => 'redis','redis' =>array ('host' => '127.0.0.1','port' => '6379','password' => '','timeout' => '2.5','persistent_identifier' => '','database' => '0','compression_threshold' => '2048','compression_library' => 'gzip','log_level' => '1','max_concurrency' => '6','break_after_frontend' => '5','break_after_adminhtml' => '30','first_lifetime' => '600','bot_first_lifetime' => '60','bot_lifetime' => '7200','disable_locking' => '0','min_lifetime' => '60','max_lifetime' => '2592000',),),'db' =>array ('table_prefix' => '','connection' =>array ('default' =>array ('host' => '数据库地址','dbname' => '数据库名称','username' => '账户','password' => '密码','model' => 'mysql4','engine' => 'innodb','initStatements' => 'SET NAMES utf8;','active' => '1',),),),'resource' =>array ('default_setup' =>array ('connection' => 'default',),),'x-frame-options' => 'SAMEORIGIN','MAGE_MODE' => 'developer','cache_types' =>array ('config' => 0,'layout' => 0,'block_html' => 0,'collections' => 0,'reflection' => 0,'db_ddl' => 0,'eav' => 0,'customer_notification' => 0,'full_page' => 0,'config_integration' => 0,'config_integration_api' => 0,'translate' => 0,'config_webservice' => 0,'compiled_config' => 1,'cart2quote_license' => 0,),'install' =>array ('date' => 'Thu, 01 Jun 2017 08:25:45 +0000',),'http_cache_hosts' =>array (0 =>array ('host' => '127.0.0.1','port' => '80',),),'system' =>array ('default' =>array ('dev' =>array ('debug' =>array ('debug_logging' => '0',),),'smile_elasticsuite_core_base_settings' =>array ('es_client' =>array ('servers' => 'localhost:9200','enable_https_mode' => '0','enable_http_auth' => '0','http_auth_user' => '','http_auth_pwd' => '',),),),),'cache' =>array ('frontend' =>array ('default' =>array ('id_prefix' => 'm2_','backend' => 'Cm_Cache_Backend_Redis','backend_options' =>array ('server' => '127.0.0.1','port' => '6379','persistent' => '','database' => 1,'force_standalone' => 0,'connect_retries' => 2,'read_timeout' => 10,'automatic_cleaning_factor' => 0,'compress_tags' => 1,'compress_data' => 1,'compress_threshold' => 20480,'compression_lib' => 'gzip',),),'page_cache' =>array ('id_prefix' => 'm2_','backend' => 'Cm_Cache_Backend_Redis','backend_options' =>array ('server' => '127.0.0.1','port' => '6379','persistent' => '','database' => 2,'force_standalone' => 0,'connect_retries' => 2,'read_timeout' => 10,'automatic_cleaning_factor' => 0,'compress_tags' => 1,'compress_data' => 1,'compress_threshold' => 20480,'compression_lib' => 'gzip',),),),),);
4.测试
如果有问题的话,
先清除redis缓存:
1,命令行里执行:
redis-cli
就进入了 redis 控制台,
2,然后执行:
FLUSHALL
就是清空全部缓存,如果显示 OK 就是成功了,
3,再执行:
exit
来退出。
再更新下文件:
php bin/magento maintenance:enablerm -rf var/di/* && rm -rf var/generation/* && rm -rf var/cache/* && rm -rf var/page_cache/* && rm -rf var/view_preprocessed/* && rm -rf pub/static/* && rm -rf generated/* && mkdir var/diphp bin/magento setup:upgrade && php bin/magento setup:di:compilephp bin/magento setup:static-content:deploy -f && php bin/magento indexer:reindex && php bin/magento maintenance:disable && php bin/magento cache:clean && php bin/magento cache:flush
浏览器打开M2网站,
然后在命令行里输入
redis-cli monitor


